Like the Tcho-vision says: Obsessed (with chocolate)
There's no lack of love for chocolate in this household, but there's one
particular boy whose passion for chocolate is probably only surpassed
by his passion for dogs (although I'd have to actually check with him on
that). And because this boy had some assigned-for-winter-break homework
assignments (argh!) that were just not getting done, there needed to be
an incentive....and so I created our first ever San Francisco
Self-Guided Chocolate Tour of 2014. I've never seen homework done so fast! So I did some research and created a map:
THE GREAT SAN FRANCISCO CHOCOLATE TOUR MAP
View SF Chocolate Tour in a larger map
This might look a little daunting. As long as you're familiar with SF and have no fear of driving and finding parking, it's actually a piece of cake. I highly recommend that you begin at Tcho on the Embarcadero at Green, as first thing in the morning it's much easier to get in and out of the area. I'm also not going to review the actual chocolate....there are too many choices and too much variation. The boy is all about dark chocolate and the girl is all about milk chocolate so there ya go. This is more about an excursion of love......
And so we did begin at Tcho.....
Tcho - New American Chocolate
Bean to Bar factory and retail outlet
Embarcadero - Pier 17
[UPDATE: Tcho Factory is
moving to Berkeley. As of June 7, 2014, it's
not open yet.
We arrived by 10am (they open at 9) to see if we could put our name on the waiting list for the 10:30a tour. There were 6 names in front of us that did the same. So here's a tip: go in at 9a if you haven't reserved a free tour (10:30a & 2p) - tcho.com/tour. We did not make it on the tour. While we were waiting we ordered a couple of cups of peppermint chocolate drink, and I got a Blue Bottle redeye. That's coffee with espresso added. Yep...needed to start the day right. And it was very well made. Very friendly retail staff. The displays in the store are pretty. There are a couple of samples set out - dark chocolate and milk chocolate. That's about it, really. We asked for some explanation on all the different boxes and it seems they just create pretty packaging for similar items. So we chose a few things and took our stuff outside to eat. You see above there is a large table that you could sit inside and eat your purchased goods.....but it was a beautiful day by the water, so why not enjoy that?

XOX Truffles
Truffles made on site
North Beach
A little history....Scott and I used to live right above XOX in our first apartment together in San Francisco. It was 1988-1989. Unfortunately XOX did not exist then - but if you look at the photo below, Petite Deli did - our apartment included all four windows right above XOX (blue awning) and Petite Deli. They apparently opened in October, 1998....actually almost 9 years to the day after we moved out and up to Russian Hill.
So we discovered it on one of our nostalgic tours back around the 'hood way back when. And then, to our amazement, they opened an outlet in Oakland in Montclair. Unfortunately, it didn't last and today when I told him I missed them in Oakland, he said "I don't miss being there." Uh, okay. Then he added that it was too hard to focus on both locations. Makes sense.
Anyway, if you're like me and hate the hard shells that come on most truffles, then this is the place for you. And if you wonder where they're made, then take a look at the owner/chef making a batch. Right here, baby.....right here.
XOX truffles are like eating only the center ganache of a truffle - and this is the only type of truffle I will eat. The flavors they offer at XOX are so delicious that you have to select at least 4 or 5 flavors. Caramel is always a favorite. I also enjoy the Kahlua. The teens liked orange and lemon and Earl Grey among others.
You can then take your lovely truffles and a coffee and sit outside to enjoy watching all of the Columbus Ave. passers-by.
Moving along, we made our way over to Hayes Valley.
Christopher Elbow Artisanal Chocolates
Hayes Valley
Christopher Elbow is an old favorite. After years and years of SF Boys Chorus and SF Girls Chorus, I have haunted every Hayes Valley location and then some. Especially during the holidays when rehearsals at Davies Symphony Hall were long and frequent. Their liquid chocolate comes in a number of different flavors and it is just over-the-top deliciousness. Their service is almost always top-notch (save for some black Friday craziness, but they get a pass for that). So on this day, a Friday morning with not too many customers, the lovely gal lived up to what I expected in service. There were samples offered to the kids while I was in the restroom (and btw, I'm obsessed with their sink - please check out their bathroom while you're there) and when I returned they had each almost finished their selections of chocolates. They also have seating that is super-comfy. All-around enjoyable experience here.

Now over to Noe Valley. Unfortunately, I spent a good deal of time trying to locate some Sixth Course Chocolates. They apparently do very well in the International Chocolate Salons held in SF, so I thought we could get some at 24th St. Cheese Co. Sadly they were out and hadn't ordered any more - but meant to. LOL. Okay...the kids did a little salumi tasting and chose a spicy salami to buy. They enjoyed the little break from sweets. Fortunately, we were only a couple of blocks from......
Chocolate Covered
Noe Valley
 |
| Storefront from the Chocolate Covered website | | | |
|
Holy moley.....the holy grail of all chocolate bars you may be looking for from around the world. Truly wonderful shop that you could peruse for hours. The owner is very helpful and knowledgeable and figures out what you're looking for, then provides samples in that realm to help you choose. The boy may have offended him a little as we discussed Oakland, and Bittersweet, and the fact that the owner's friend, who started Bittersweet, went to Hawaii to start up a new chocolate venture - growing beans to bars - and the boy said "oh -
Lonohana? I didn't like their chocolate." Way to go dude. To be fair, he's only tried the 'Ele'Ele bar and is open to trying others. Doink.
Give yourselves some time here, as there is much to be seen.
And now for some lunch......
ChocolateLab - A Savory and Sweet Cafe by Rechiutti
Dogpatch
Apparently even chocolatiers want to do other things (isn't it usually tech or business people who want to pitch it all and make chocolate?)
So ChocolateLab has a few very nice menu items, including this sweet little chicken pot pie that the girl ordered and loved.
The boy ordered a cheese plate that included 3-4 cheeses, crackers, dates, an olive and some honey produced from bees on-site. He was in heaven. I ordered their quinoa bowl with veggies & apples - apparently if you like turkey the smoked turkey version is amazing. I was happy with my choice.
And then there was the dessert menu that includes many decadent items.
The boy almost went for the brownie concotion, but at the last second
switched to the drinking chocolate with marshmallows. Wait a
sec.....didn't he get that at Tcho, also? This is a boy who likes to
keep his chocolate as pure as possible.....
After we left we stopped next door to
Little Nib, their tiny Recchiuti retail location. This is our first run-in with service that was just okay....or worse. Not a lot of help in sorting through their selection, even when asked....and no samples at all. I don't require samples, but all in all, the store was just... meh. If you like their chocolate, try the Ferry Building location....I have to believe the service is much better. I think it was a theme, because right around the corner on 3rd St. is.....
Dogpatch
We walked in and there's a small retail area with product placed around the front, then desks for workers behind the counter. You're very much left on your own....and the guy who came to the front to help mostly sneered at us and had a bit of that hipster-holier-than-thou 'tude. After we selected and paid for a couple of items completely without help or input, he did offer a sample of toffee he had to the back of the counter. It was good....but didn't make up for the unwelcome feeling for most of the visit. Really no need to return here....if you like their chocolate they sell it elsewhere.
And we're off to Potrero...which really wasn't going to be part of the tour. However, since we didn't find Sixth Course in Noe Valley, and we had some time, we ran over to Salumeria, which was also supposed to carry them. Nope. Out. Okay - how about down the block at Heath Ceramics? Sorry - they were here yesterday! Somebody must have bought them all! Grrrr. Never mind - I'll get some beans at the Blue Bottle that shares the Heath space, and then let's just add....
Potrero Hill
Sweet little shop right next to Charlotte Russe headquarters (hey CR peeps-they do high tea-let's meet for that sometime!). They actually make the chocolates between 7a and 3p....the retail shop opens at 11a....so if you're there between 11a and 3p you'll see some action. There are also tours.....which eekgaawd you have to pay for! Aw well, had I planned to come, I'd still have paid to tour. Very sweet girl working the counter....and samples were out and easy to find. All this time, this place has been less than 3 blocks from the SPCA where the boy volunteers weekly, and he had no idea. Hee hee.
Okay....after running into a friend at Chocolate Covered, we ended up hanging with them awhile at their Noe Valley pad, mere blocks from our ultimate desination.....
Bean to Bar Chocolate made in the Mission, SF
Mission District
I had crafted the day to end at Dandelion to take advantage of their 6:00pm public tour. My inability to navigate their website appropriately actually helped us in the long run. I called Tuesday, they told me where to go on the website, I said okay, then couldn't find it and filled in a private event webform, then called Friday morning and they said "just come right before and we can usually fit people in" and so we did and then they were full...... I tell you all this because I want you to know the story I told Chelsea, working at the cash register and listening to the crazy lady tell her tale of woe. So Chelsea, who happens to have taught at both Montera Middle School and Oakland Tech (she doesn't look much older than the students so I don't know how that happened!), as I found out later, went upstairs to talk to someone. She came down 10 minutes later to let us know that if, in fact, we could not hop onto the last tour, then the CEO would give us a private tour at 6:30p, if we didn't mind waiting. Wow......just wow. We didn't mind waiting. As we sat at one of their comfy tables, just talking and taking it all in, and frankly, relaxing, since we'd been on our tour-de-chocolate since 10am, Chelsea brought over 3 cups of drinking chocolate....gratis. And pointed to where the marshmallows are that can be added, if you'd like. (Are you keeping track of the # of drinking chocolates the boy specifically has had at this point? 3. It's 3. Seriously, 3.) This is when we chatted awhile longer with Chelsea, found out her Oakland connection, and fell in love with her. And while you chat with her, notice that she sounds and has mannerisms JUST LIKE Kelly Clarkson. For real. And I'm not the only one who has told her that.....Chelsea also did tell us that there was another guy who had been hanging
around and just really, really, really wanted a tour, and would it be
okay if he came on our tour? Cuz you know it was "our tour" now. Well,
yes of course - anyone who is as passionate about good chocolate as we
are should be able to come on "our tour."
 |
| Waiting for "our tour" |
Anyway, just before 6:30 Todd came out and took us back for a tour. It lasted about 45-ish minutes and covered every single thing I wanted to know. Todd was patient and broke down every component of the process so we understood. We were patient with the guy who came on "our tour" with all of his questions because he was "in the industry." And by that I mean he used to be a coffee guy. Beans, you know. But he kind of really didn't know. Whatever.
The retail space sets out many sample of their bars....which are all made with cacao and sugar, period. End of story. No added cocoa fats, cocoa butter (that's for smooth, supple skin, anyway, right?), no lecithin, nothing but the chocolate and the sugar. There are a ton of menu items, including a fruit blended drink made from the fruit of the cacao bean.....which is not a chocolate flavor at all.
Bottom line is that Dandelion became and will remain our favorite chocolate location in SF. We will visit it and drink it and eat it and wash in it and talk about it and BART to it and try to intern at it forever because of the service we received. Thank you Dandelion, for topping off our SF Chocolate tour so spectacularly!
Because we were a little dizzy from our day o' chocolate, we topped it off with great Mission mexican food at Tacqueria el Buen Sabor at Valencia and 18th. Not a hipster joint....real and true food and beer and horchata. Whew. I think we can go home now. Ni-night San Francisco!





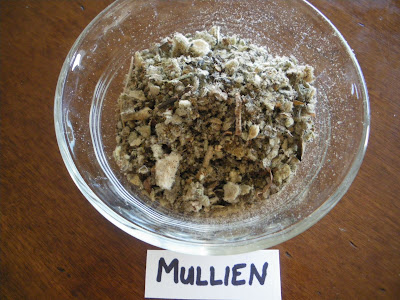
 This herb is used to help relieve inflammation of the bronchial.


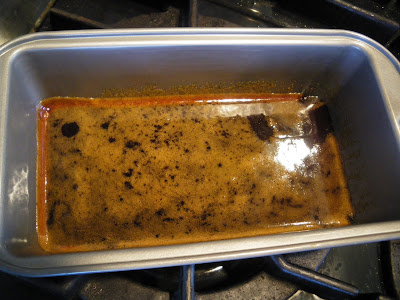 If you decide to pour it on a cookie sheet you're done. You'll simply break it up like brittle when it's ready. But if you use a pan like I did (thinking I could make the shape of the original herbal flavor Ricolas) you need to score the cough drops...unless you're a hard candy expert and know how to quickly and efficiently pull and shape the taffy-like candy into little balls. That's not me so I'm scoring. The challenge is that you have to score when it's not too hot and not too cool. I would run my small, sharp knife through a little butter, then dip the tip in and draw a line. Sometimes I'd start at the edges and do the edges all the way around, then wait as the middle cooled a bit more a go back in a little at a time. When it's too hot the candy sticks to the knife - too cool, you won't be able to score it at all.

 After mixing and kneading sort of like a dough, it gets rolled out and cut into it's circles. I used the top of a salad dressing bottle. I would have taken a photo of the kneading process, but it was so sticky I had to get a rubber spatula and go over my hands with it to get it all off....not a good combo for trying to use a camera.
 Ahhh.....dunking in the good stuff (and by the way - the recipe says you can put the chocolate in the microwave or a double boiler - I highly recommend the double boiler):
 And let me rest in the refrigerator to firm up:
 And finally, the inside of the finished product:


